SFTP Gateway Guide for eCourtDate
What is eCourtDate?
eCourtDate is a cloud-native communications platform used by justice systems such as courts and prosecutors. Agencies can automatically send and receive two-way messages via texts (SMS), email, and voice calls.
SFTP Gateway allows system admins to integrate eCourtDate's scheduling and messaging capabilities into their own applications and workflows.
eCourtDate Agency Required
Getting Started
SFTP Gateway is designed to automate flat file transfers to eCourtDate's Uploads feature.
Step 1 - Create a Server
From the Console SFTPs page, click on the Add Server button and complete the form.
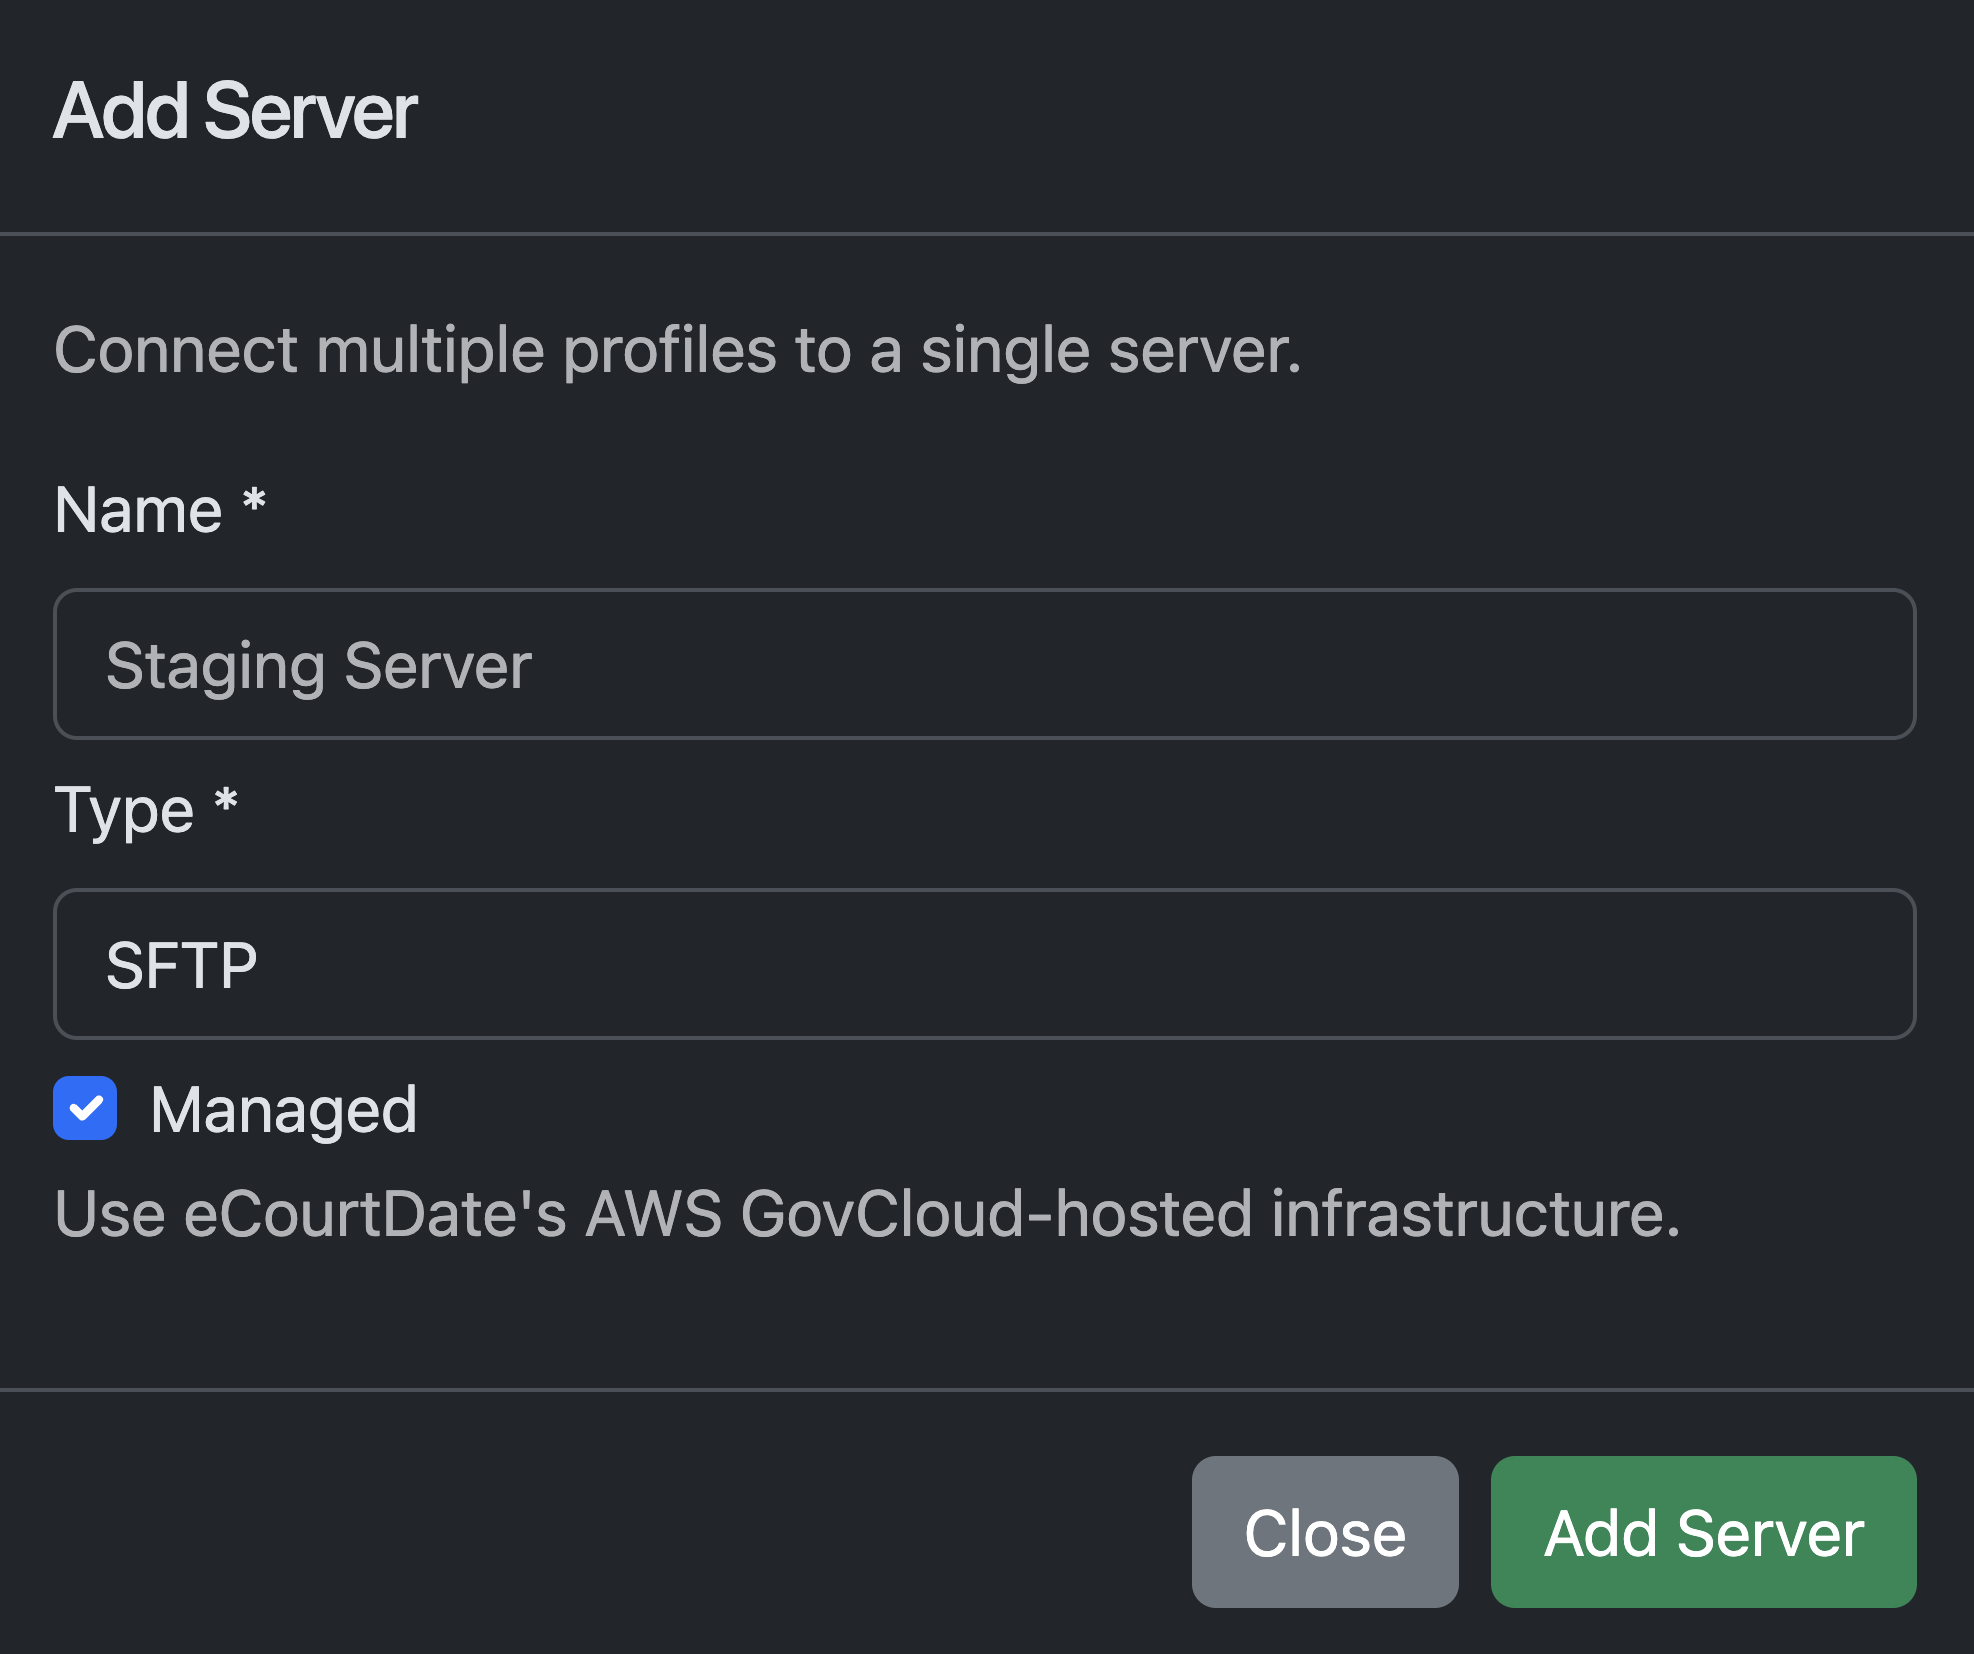
SERVER NAME
Choose a name for your server for easy identification.
SERVER TYPE
- SFTP - connect to a managed or self-hosted server
- S3 - connect to an AWS S3 or S3 compatible bucket
MANAGED INFRASTRUCTURE
Check the box if you want eCourtDate to manage the infrastructure in AWS GovCloud (additional costs may apply).
If you choose managed, please allow for 1 business day for the server to be created.
SERVER HOST or IP
Enter the server IP address.
USERNAME
Enter the username for the server.
PASSWORD
Enter the password for the server. If you are using an SSH private key, leave this blank.
PRIVATE KEY
Enter the private key for the server. If you are using an SSH private key, you can upload the key here.
PORT
Enter the port for the server. Default is 22.
TIMEOUT
Enter the timeout for the server. Default is 10 seconds.
DIRECTORY
Enter the default directory for the server.
S3 HOST
Enter the S3 host. (e.g. s3.us-gov-east-1.amazonaws.com)
BUCKET NAME
Enter the name of the S3 bucket.
REGION
Enter the region for the S3 bucket. (e.g. us-gov-east-1)
ACCESS KEY
Enter the access key for the S3 bucket.
SECRET KEY
Enter the secret key for the S3 bucket.
PATH
Enter the path for the S3 bucket. (e.g. /uploads)
REQUIRED PERMISSIONS
You must use a role with the following permissions for the bucket:
- s3:ListBucket
- s3:GetObject
- s3:PutObject
- s3:DeleteObject (optional)
Step 2 - Create an SFTP Profile
From the Console SFTPs page, click on Add SFTP and complete the form.
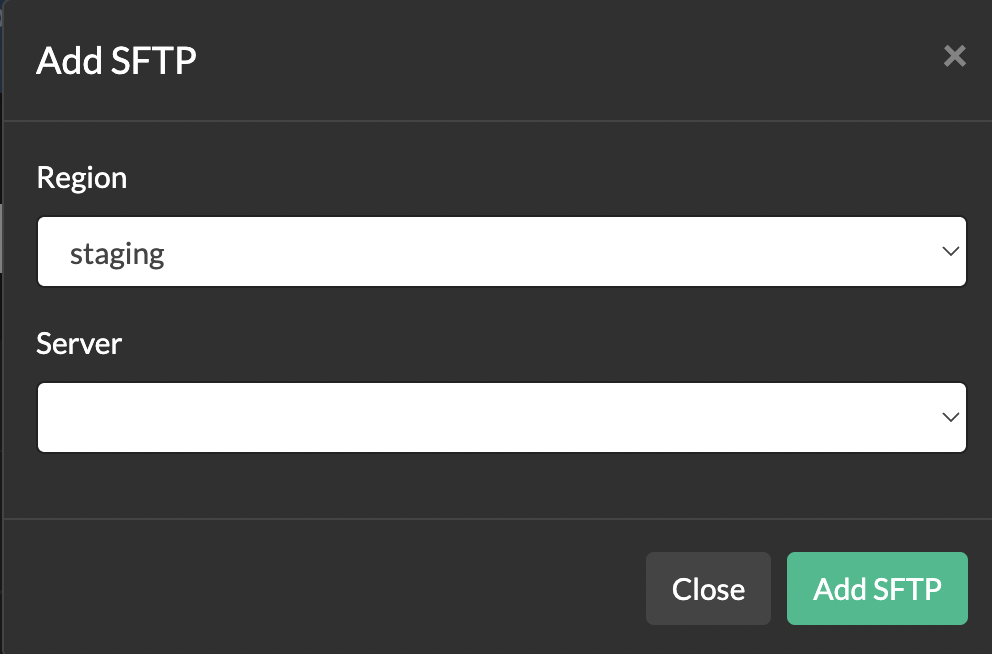
Review the following settings:
Auto Upload Settings
- Source Directory - the directory on the server to monitor for new files
- Upload Template - the template to use for the upload in the chosen agency
- Filename Keyword - a keyword to identify files that should be uploaded
- Filename Blockword - a keyword to identify files that should not be uploaded
- Max Files per Upload - the maximum number of files to upload in a single sync
- Delete File After Upload - delete the file after it has been uploaded
Note: we recommend enabling the Delete File After Upload setting to minimize unnecessary files in the source directory. If you are using a managed server, the permissions allow for this to be done automatically.
Step 3 - Enable Automatic Uploads
Turn on Auto-Sync Enabled when ready to transfer files automatically.
eCourtDate will automatically check the server on an hourly basis for new files.
Ensure that you see at least one file in the files list. If you do not, verify that you have uploaded a file to the correct directory.

How to Connect to a Managed Server
Using SSH
The first time connecting, locate the private key, and set the permissions:
chmod 400 {key.pem}
Using SSH
The first time connecting, locate the private key, and set the permissions:
chmod 400 {key.pem}
 Using Transmit
Transmit is a file transfer client program for macOS.
 Using PuTTY
Convert the private key using PuTTYgen
PuTTY does not natively support the PEM format for SSH keys. PuTTY provides a tool named PuTTYgen, which converts PEM keys to the required PPK format for PuTTY. You must convert the private key (.pem file) into this format (.ppk file) in order to connect to the server using PuTTY.
- From the Start menu, choose All Programs, PuTTY, PuTTYgen.
- Under Type of key to generate, choose RSA. If your version of PuTTYgen does not include this option, choose SSH-2 RSA.
- Choose Load. By default, PuTTYgen displays only files with the extension .ppk. To locate your .pem file, choose the option to display files of all types.
- Select your .pem file for the key pair that you specified when you launched your instance and choose Open. PuTTYgen displays a notice that the .pem file was successfully imported. Choose OK.
- To save the key in the format that PuTTY can use, choose Save private key. PuTTYgen displays a warning about saving the key without a passphrase. Choose Yes.
- Specify the same name for the key that you used for the key pair and choose Save. PuTTY automatically adds the .ppk file extension.
 Using WinSCP
WinSCP is a popular SFTP, FTP, and SCP client for Windows.
Setup Connection
- Launch WinSCP and click on New Site
- Set File protocol to SFTP
- Enter the server IP address in the Host name field
- Enter the port number (default is 22) in the Port number field
- Enter the username in the User name field
- Leave the Password field blank if using a private key
- Click on Advanced to configure the private key
Configure Private Key
- In the Advanced Site Settings, navigate to SSH > Authentication
- Click the ... button next to Private key file
- Select your .ppk file (converted using PuTTYgen as described above)
- Click OK to save the advanced settings
- Click Save to save the site configuration
- Click Login to connect to the server
The first time connecting, WinSCP will ask you to verify the server's host key. Click Yes to continue.
Connect to the server using the provided username and IP address:
ssh -i {key.pem} {username}@{server_ip}
The first time connecting, you'll see the following response:
The authenticity of host {server_ip} can't be established.

          ECDSA key fingerprint is {server_fingerprint}.

          Are you sure you want to continue connecting (yes/no)?
Enter yes
Best Practices
Use the following best practices to ensure a secure and reliable connection to the server.
- Ensure that your client's IP address has been whitelisted on the server.
- If you are using an outbound firewall, ensure that the SFTP port is open.
- The private key should be located in the .ssh directory of the user's home directory.
- Do not store the private key in a shared location or in a repository.
Troubleshooting
SFTP Client Limitations
- For File Transfer Protocol (FTP) and FTPS, only Passive mode is supported.
- File names must be in UTF-8 encoding. Using different encoding can lead to unexpected results.
Server Error Responses
Connection timed out or Connection refused:
Ensure that your client's IP address has been whitelisted on the server.
Permission denied or Authentication failed or Server refused our key:
Ensure that you are using the correct username.
If you are using an SSH private key, ensure that the password and passphrase are blank or disabled. The private key should have user read-only permissions.
Check Your IP Address
Managed SFTP servers require your client's IP address to be whitelisted. To find your public IP address:
Using a Web Browser
Visit checkip.amazonaws.com to view your public IP address.
Using the Command Line
Linux / Mac curl https://checkip.amazonaws.com
Windows (PowerShell) (Invoke-WebRequest -Uri "https://checkip.amazonaws.com").Content
Once you have your IP address, ensure it has been added to the server's whitelist in the Console.
Test Basic Connectivity
Before troubleshooting authentication issues, verify that you can reach the server:
Test Port Connectivity
Check if the SFTP port (default 22) is reachable from your network:
Linux / Mac nc -zv {server_ip} 22
Windows (PowerShell) Test-NetConnection -ComputerName {server_ip} -Port 22
Test Network Reachability
Verify that the server is reachable from your network:
All Platforms ping {server_ip}
Expected Results
- Success - Port connectivity test shows "open" or "succeeded". Proceed to authentication troubleshooting.
- Connection refused - The server is reachable but SFTP service may not be running. Contact support.
- Connection timed out - Your IP address may not be whitelisted, or a firewall is blocking the connection. Verify your IP is whitelisted and check your outbound firewall settings.
Unprotected Private Key
Ensure that your private key is not unprotected. Replace key.pem or key.ppk with your private key file name.
The private key should have user read-only permissions.
OpenSSH - use the chmod command to set the permissions: chmod 400 {key.pem}
Windows - run the following commands to secure the private key:
icacls "%USERPROFILE%\.ssh\key.ppk" /inheritance:r
icacls "%USERPROFILE%\.ssh\key.ppk" /grant:r "%username%:(R)"
Note: to get the file path, shift and right-click on the private key file and click "Copy as path".
Enable Debug Logging
If you are experiencing issues, enable debug logging to capture detailed information about the connection and transfer process.
OpenSSH ssh -i "path\to\key.pem" user@hostname -v or for additional details: ssh -i "path\to\key.pem" user@hostname -vvv
PuTTY plink -i "path\to\key.ppk" user@hostname -v or for additional details: plink -i "path\to\key.ppk" user@hostname -vvv
WinSCP WinSCP.exe /log="path\to\logfile.log" /loglevel=5
For GUI clients, enable debug logging in the application settings:
WinSCP GUI WinSCP > Options > Logging > Debug
Transmit Transmit > Preferences > Logging > Debug
FileZilla Edit > Settings > Logging > Debug
Cyberduck File > Log > Debug
FTPRush Tools > Options > Logging > Debug
Upload Templates
Use Upload Templates to process flat files based on configurable settings and mappable fields.
Processing Method
- Update by Fields - each file should include only newly created or updated data since the last upload.
- Load and Replace All Uploads - each file should include all data agency-wide.
- Load and Replace All Uploads Using This Template - each file should include all data created using the Upload Template.
Processing Order
Choose whether files process based on Ascending or Descending sort order.
Exclude from Processing
Use the Exclude Settings to exclude individual rows from processing.
Configurable Reference Fields
Reference fields are your internal IDs for a given data model.
- Client Reference
- Event Reference
- Payment Reference
- Case Number
Unique Identifiers
The following data models can combine fields to create a unique identifier.
- Clients
- Cases
- Events
The following data models are tracked based on their unique identifier:
- Contacts - the Contact Phone or Contact Email
- Payments - the Payment Reference and Payment Amount
File Formats
We support flat files such as TXT, CSV, and XLSX. We recommend TXT files for maximum compatibility.
Files can be Pipe (|) or Comma (,) delimited.
Date and Time Formats
Dates and times formats can be parsed automatically or use a predefined format.
Resource Linking
The following data models can link to preexisting agency resources:
- Locations - Location Name or Location Reference.
- Flows - Flow Name or Flow Reference.
- Portals - Portal Name or Portal Reference.
- Agencies - Agency Name or Agency Reference.
- Users - User Email.
Example: Instead of including the full location address Municipal Court 123 Address, use the Location Name Municipal Court to link an agency location.
Field Mapping
Map fields based on the column header or numeric position.
By Column Header
Paste the value of your column header into each eCourtDate upload template field. You don't need to change your column header naming convention. Each field mapping should match the exact value of the column header in your file and is case-sensitive. You can map a single file field to multiple eCourtDate fields.
Default Fields
Use the Default Field value if you do not map the field or the field is empty / not found for a given row:
- Client Status
- Client Group
- Event Status
- Payment Status
- Payment Amount
- Location
- Portal
- Flow
File Naming Convention
Files that were previously uploaded to eCourtDate are skipped when syncing. To ensure that each file uses a unique name, we recommend the following naming convention:
[Year]-[Month]-[Day]-[Hour]-[Min]_[Agency]_[UploadTemplate].[ext]
Example:
Uploading Multiple File Feeds
If you have a single server connection with multiple file feeds, we recommend creating a separate SFTP Profile for each file feed. Each SFTP Profile should be linked to the same server but configured with its own settings.
A single server can also support multiple agencies. Each SFTP Profile can be linked to a different agency, allowing you to route different file feeds to different agencies from the same server connection.
Recommended Configuration
Separate Source Directories
Use a separate source directory for each file feed from the root directory (e.g., /hearings, /payments, /clients).
Upload Template Mapping
Map each SFTP Profile to a specific Upload Template that matches the file feed's data structure.
Agency Assignment
Assign each SFTP Profile to the appropriate agency. This allows a single server to serve multiple agencies, with each SFTP Profile routing files to a different agency.
Filename Filtering
Use the Filename Keyword and Filename Blockword settings in each SFTP Profile to ensure that only the correct files are imported:
Filename Keyword - Only files containing this keyword will be uploaded. For example, set the keyword to hearings to only import files like 2024-01-15_hearings_export.csv.
Filename Blockword - Files containing this keyword will be skipped. Use this to exclude files that should not be processed by this profile.
Example Setup
For a server with multiple file feeds across two agencies:
| SFTP Profile | Agency | Source Directory | Upload Template | Filename Keyword |
|---|---|---|---|---|
| County A - Hearings | County A Court | /county-a/hearings | Hearings Template | hearing |
| County A - Payments | County A Court | /county-a/payments | Payments Template | payment |
| County B - Hearings | County B Court | /county-b/hearings | Hearings Template | hearing |
This configuration ensures that each file feed is processed independently with the correct template and agency settings.
Upload Scheduling
If Auto-Sync is enabled, eCourtDate will automatically check the server on an hourly basis for new files. You can upload new files at any time. You should expect a delay of up to 1 hour for new files to be processed.
If multiple files are uploaded at the same time, eCourtDate will process them in the order they were uploaded.
We recommend the following upload schedules in the agency's timezone:
- Hourly start of the hour to ensure that the data received includes all of the previous hour's data.
- Daily start of the day to ensure that the data received includes all of the previous day's data.
- Weekly after midnight on Sunday to ensure that the data received includes all of the previous week's data.
- Monthly start of the first day of the month to ensure that the data received includes all of the previous month's data.
Technical Support
If you have any questions or issues while using eCourtDate's SFTP Gateway, please contact our support team at help@ecourtdate.com. We're here to help.
Please provide the following information when contacting support:
- The SFTP Gateway server IP address you are connecting to
- Any IP addresses of your client's network
- The error message or issue you're experiencing
- The SFTP client you are using
- (optional) Debug or connection logs from your SFTP client
- Do not include any passwords or private keys
We appreciate any feedback or suggestions to improve our SFTP Gateway and technical resources.